
API Gateway is a powerful API management tool that helps developers align requests with specific backend services, the most common being Lambda functions. For developers, the first step is to develop and test your application locally. Lucky for us Amazon Web Services provides a lot of tools and resources, including the AWS CLI and SAM! In today’s article we will be demonstrating how to run api-gateway locally for local web development and testing. This example uses NodeJS 16.x.
Running API Gateway Locally Requirements
You will need the following applications and resources to run API Gateway locally.
- AWS Cli version 2
- AWS SAM
- Docker
- an Editor (VSCode is recommended, screen shots are using SciTE Windows full 64 bit version)
- NodeJS 16.x and npm (The Node.js installer includes the NPM package manager)
- Python (you may need to install Python as well for AWS CLI tools and SAM)
Everything above should be installed with the normal default options, just walk through the setup installs or instructions and leave everything with their defaults. Docker may appear to be the most complicated part, but luckily you don’t need to know anything about Docker other than it will be running in the background. Once you are done installing everything above it may be worth doing a fresh reboot of your computer before we continue.
Checking the local environment
Open a command prompt and run the following commands to make sure everything is working.
aws --version
sam --version
node --version
In my case I see aws cli is using version 2.4.3, sam is using version 1.57.0, and nodeJS is using 16.17.0.
Setting up your local environment
Create a folder/directory for your API Gateway application. I like to put my projects in a set of sub folders, something like /projects/clientname/projectname/api-name/ In my case my folder is: C:\projects\aws-demos\api-gateway-examples\api-local\, or /projects/aws-demos/api-gateway-examples/api-local/ for the Linux and MAC folks. I prefer to separate my project’s into multiple project folders as it is more common today to have 2 or more GIT projects for one actual project.
Open your command prompt or shell in this folder. You want this folder to be your current working directory. Create a file in the folder with the filename index.js, and put the following in the file with your favorite editor. This is a simple Lambda function that returns a “hello from Lambda” message.
exports.handler = async (event) => {
    return 'Hello from Lambda';
};
Now we need a barebones CloudFormation template with the appropriate settings for the SAM command line to map API Gateway paths to the index.js Lambda function we just created. Create a file called template.yaml in the project folder and put the following in its contents with your favorite text editor.
---
Transform: AWS::Serverless-2016-10-31
Description: Example running SAM local start-api


Resources:

 Ratings:
  Type: AWS::Serverless::Function
  Properties:
    Handler: index.handler
    Runtime: nodejs16.x
    Timeout: 30

    Events:
      Api:
        Type: HttpApi
        Properties:
          Path: /
          Method: get
That’s it! Now you are ready to run your application.
Running your local API Gateway application
Now it is time to start your local application and test your Lambda function. From the command prompt, run the following command.
sam local start-apiYou should see the following when you run the command.

Now go to your web browser to the URL provided, http://127.0.0.1:3000/ in my case, to test your Lambda function.
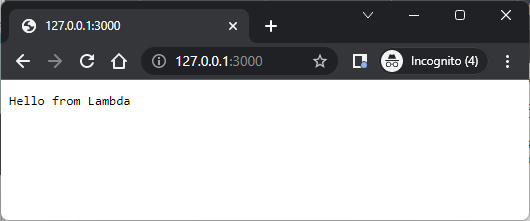
It works!!!
Lets make a change to the index.js and test again
We can make changes to our js files without restarting API Gateway running in the background. As long as the template.yaml does not change, any changes you make to the index.js will be applied in future tests. in the browser Lets add a GET query string parameter ‘name’ that when provided will return a customized hello from Lambda message. If no name is provided, we will use “who ever you are” in place of name.
First lets install a node module which we will use to escape the value passed in the query string. This is to avoid XSS injections. From the project’s folder, run the following command.
npm install htmlspecialchars
This will create a number of files. First in the root folder you should now see a package.json, package-lock.json and a folder called node_modules. Now we can use the htmlspecialchars module in our index.js app.
exports.handler = async (event) => {
    var name = ( (event && event.queryStringParameters && event.queryStringParameters.name)? event.queryStringParameters.name: false);
    if( !name ) {
        name = 'Who ever you are';
    }

    var htmlspecialchars = require('htmlspecialchars');
    return 'Hello '+ htmlspecialchars(name) +' from Lambda';
};
Now test in the browser by refreshing the page from our first test, in my case that is http://127.0.0.1:3000/.
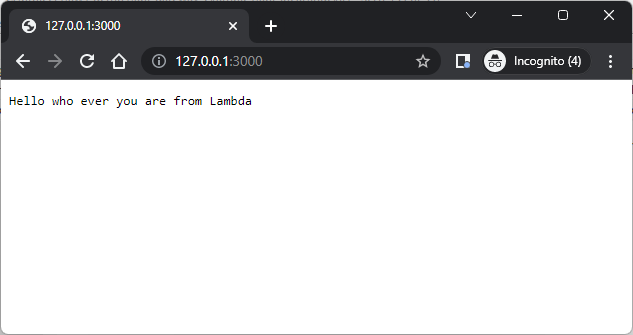
It works but we’re getting the ‘who ever you are’ in the message because no ‘name’ parameter was passed in the URL. Lets try with a query string, a question mark followed by the variable ‘name’ equals Angelo, http://127.0.0.1:3000/?name=Angelo as our test URL.
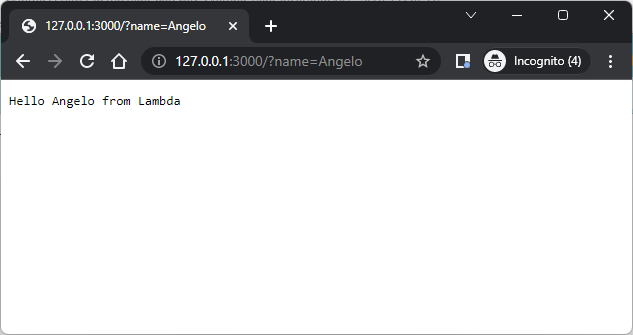
It works, I get “Hello Angelo from Lambda”.
Running API Gateway locally Conclusion
That’s all there is to it. You can learn more about AWS CloudFormation and SAM parameters for your yaml file, you can easily add additional functions as well as check out the Serverless Express module for NodeJS to have all of your API Gateway path endpoints use one “Handler:”.
