
IAM Identify Center can easily provide developers secure access to the AWS web console and temporary access keys for command line programmatic access. If you want to create an environment for developers to access specific development accounts to separate production, test, and sandbox environments such as for testing CloudFormations, this article is for you. The following will touch on best practices for security and demonstrate how onboarding for developers into an AWS environment is as simple as adding a user and set them into the developers group. The end result, developers will have a single place to sign in and be able to select the appropriate account’s AWS console and/or obtain temporary access keys and secrets for development purposes (such as SAM via command line).
This post will explain how to setup IAM Identity Center (without a SSO service) to manage logins for developers to access test and production AWS accounts. Developers will be able to sign in to the Identity Center then decide which AWS account they want to access via the AWS web console or retrieve temporary keys for programmatic command line access.
First, it is important to note that IAM Identity Center does not require you to have a Single Sign On or SAML Identity Provider. This allows even the most fledgling bootstrapped startup to setup a professional AWS environment for developers to use.
1. Add accounts (not users) to your primary AWS account
Note: If you already have multiple accounts for our various dev and testing environments, go ahead and skip to step 2. This article assumes you are creating a new development environment.
The first step is to add accounts to your current AWS account. Your first account will be referred to as your management account. Go to “AWS Organizations” by entering “organizations” in the search bar of the AWS web console. Select “AWS Organizations”. If not enabled, enable the feature. Once you are in the Organizations dashboard, click the button “Add an AWS account”.

In the create account screen, give your new account a name, email address and leave the IAM Role name as-is. Optionally add any tags you wish to add, this is where I recommend adding tags for reporting billing. Be sure to use a different email address as AWS wants each account to have a unique email address on file.
That’s it! you just create an account. Repeat above for the various accounts you may want to have for development, sandboxes, and testing. For example, you may want a duplicate environment of the production account (not necessarily duplicate data as technically you do not want user data copied to your test environment), a sandbox for developers to do random tests in, or a specific account for running system tests. In my case, I am creating just one Sandbox account for developers to use.
Setup IAM Identity Center to allow developers to have access to the appropriate AWS accounts
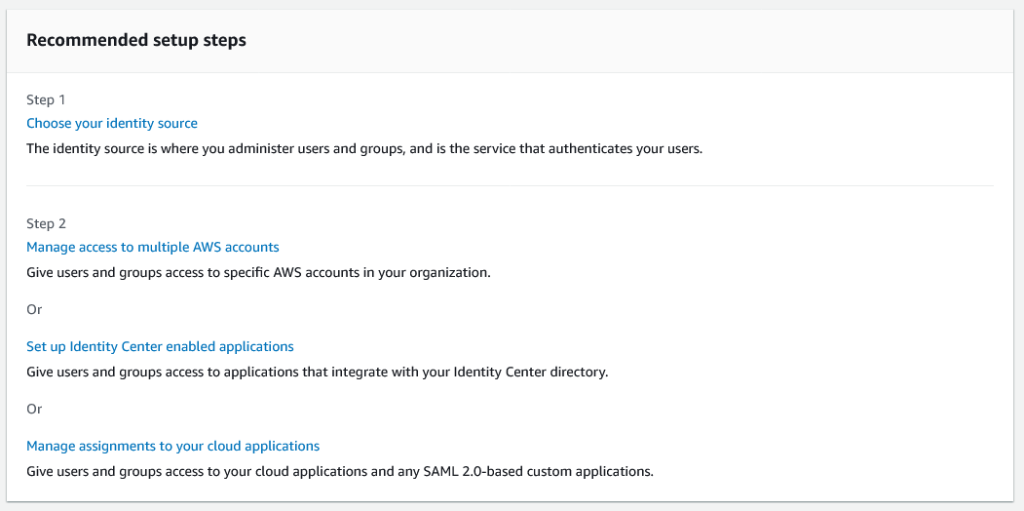
From the AWS console search, enter “Identity Center” and select “IAM Identity Center”. Once you enable the feature, you will be presented a dashboard with “Recommended Steps”. We will go over these steps but not change anything as we want to use the built-in account management (not a use 3rd party identity provider or SSO service).
Recommended Step 1 askes you to “Choose your identity source”. You will be presented a Settings page with a section with tabs, the default tab is “Identity source”. In this tab select the “Actions” drop down on the right side of the box and then select “Choose identity source”. Go ahead and select this option, you should see the following options:
Without going into detail, the first option “Identity Center directory” is the default option you will want if you are not using an Single Sign-On, Active Directory, or other identity provider service. This allows you to create users within the IAM Identity Center. The 2nd option allows you to use Active Directory and the 3rd option allows you to setup an external identity provider. Both of these options may be necessary for your organization if you are using Active Directory or other SAML 2.0 based authentication system or a 3rd party identity provider (like OKTA). If this is the case for you, please refer to this article as a general guide, you will be managing users from your Active Directory or identity provider, not through AIM Identity Center.
Recommended Step 2 from the dashboard view askes you to do one of three things: “Manage access to multiple AWS accounts”, “Set up Identity Center enabled applications”, or “Manage assignments to your cloud applications”. Ultimately we are going to use the “Manage access multiple AWS Accounts”, but because we do not have any permissions or accounts setup yet, we are NOT going to do any of these steps next. Instead we have to add some permissions in the “Permission sets” menu, then add at least one group in “Groups” menu, and finally we will go to “AWS accounts” menu (which is where “Manage access to multiple AWS accounts” links to) and associate our groups with the accounts. Once we have all this in place, then we can add users. Lets do this…
Create Permissions Set for Developers
First we need to setup permissions to allow developers to access the resources they need in the accounts we later select. We will be using pre-built permissions in this situation, but you can create custom permission set with a combination of IAM policies.
Click “Create permission Set”.
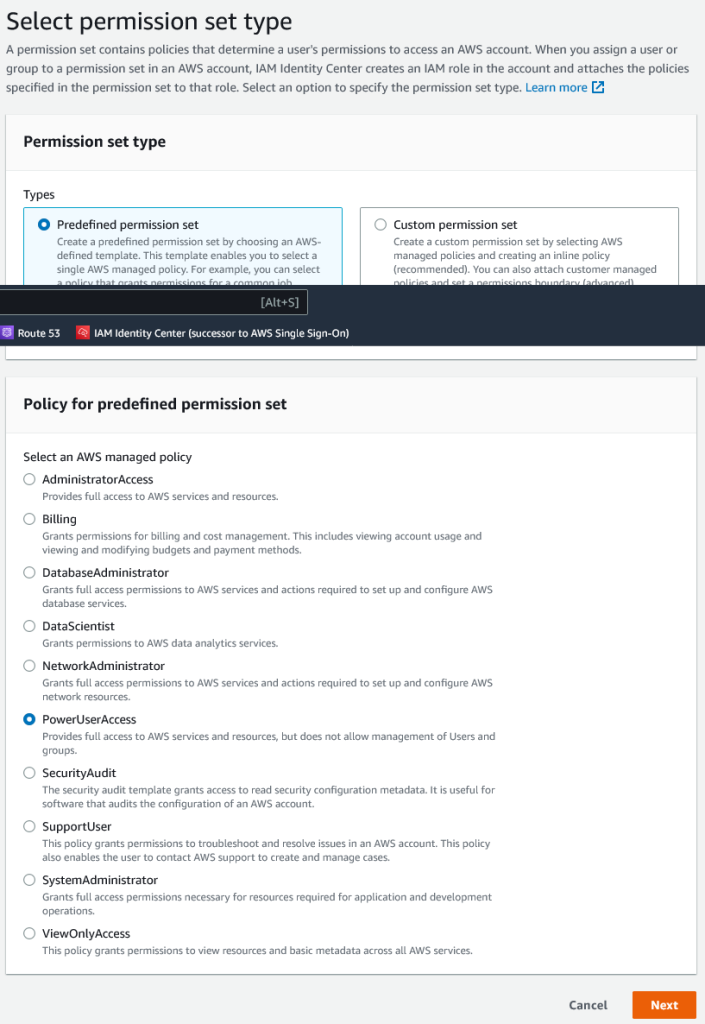
Leave the default Permission set type to “Predefined permission set”. Select “PowerUserAccess”, this allows the developer to access everything but he/she cannot create users or groups. Click “Next”.
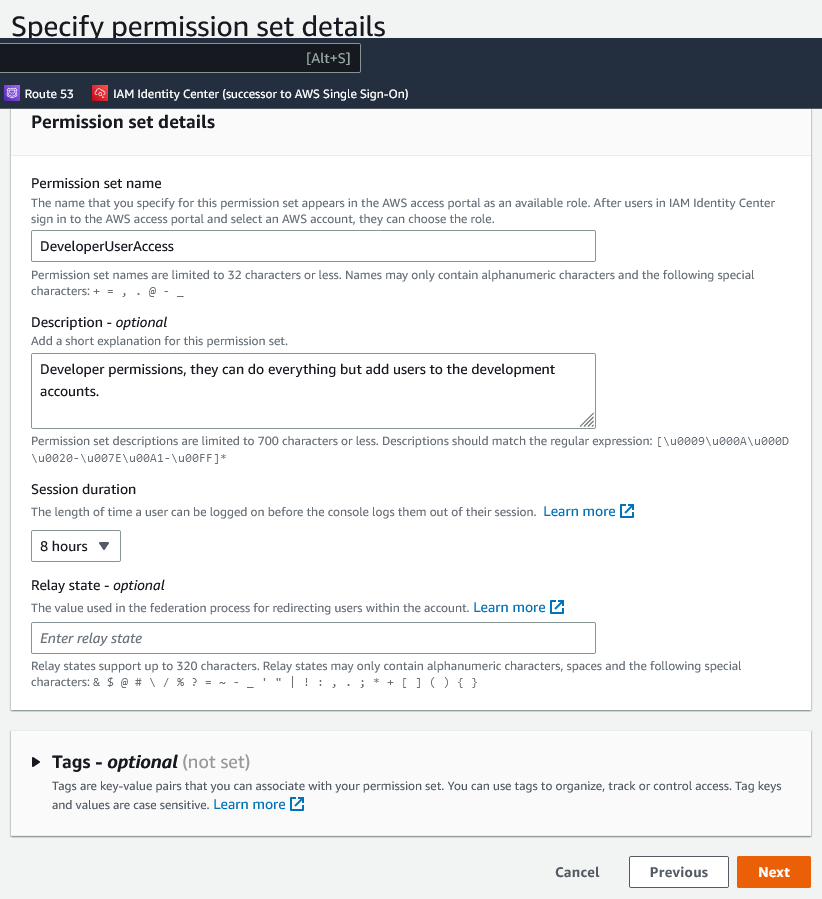
Under setting “Permission set name”, I rename the default title “PowerUserAccess” to “DeveloperUserAccess”. For “Session duration” setting, I like to select a wider window than 1 hour. Check with your company security policy however, you may have to keep this at 1 hour. Enter your optional tags if appropriate and then click “Next”.
The last screen “Review and create” is simple enough, review the information and then click “Create”.
Create a Group and add the Developer Permission Set
Go to “Groups” and then select the orange “Create group” button.
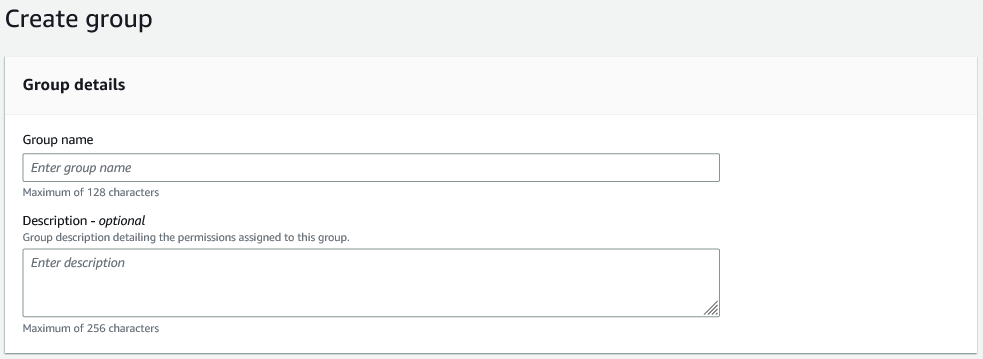
Under “Group name”, enter the name you wish to use. In my case “DeveloperGroup”. Now click “Create Group”.
Add your Developer Group to the appropriate AWS Accounts
On the left menu under “Multi-account permissions”, select “AWS Accounts”.
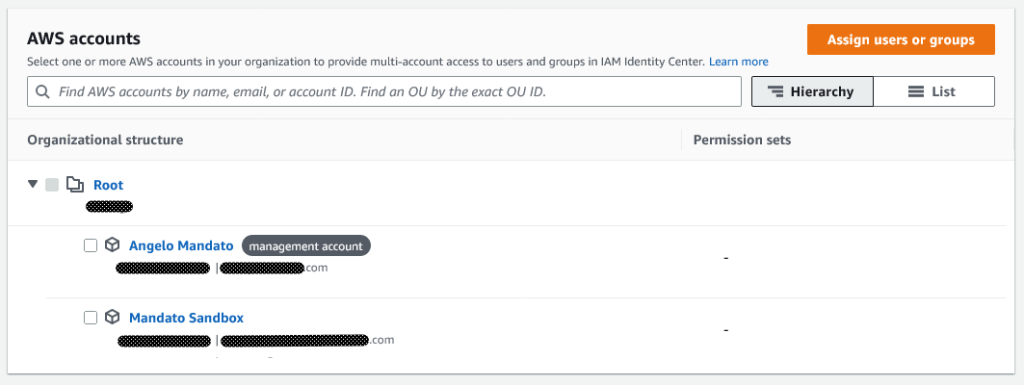
Check the box next to the accounts you created for development. “Assign user or groups” at the top right corner to assign the DeveloperGroup to the accounts. Click “Next”.
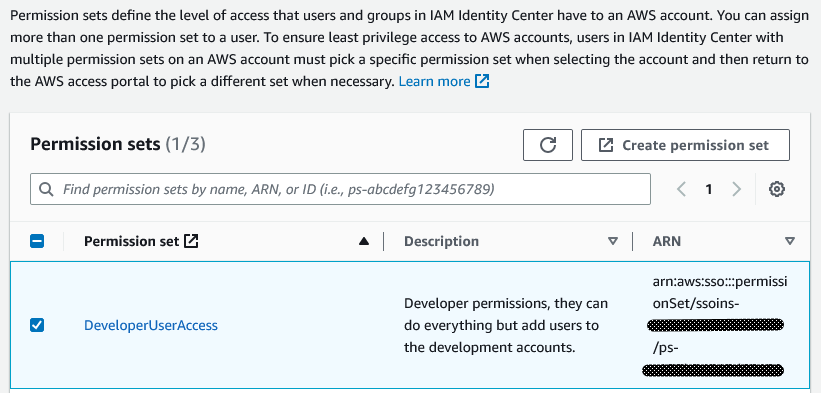
Select the Permission Sets you want to associate then click “Next”.
The last step is to review and submit the assignments you are about to create. If everything looks good, click “Submit”.

Once provisioning is completed, you are ready to add users and associate them to your Developer Group.
Add users and assign them to your Developer Group
From the menu on the left, select “Users”. Select the Add user” button.
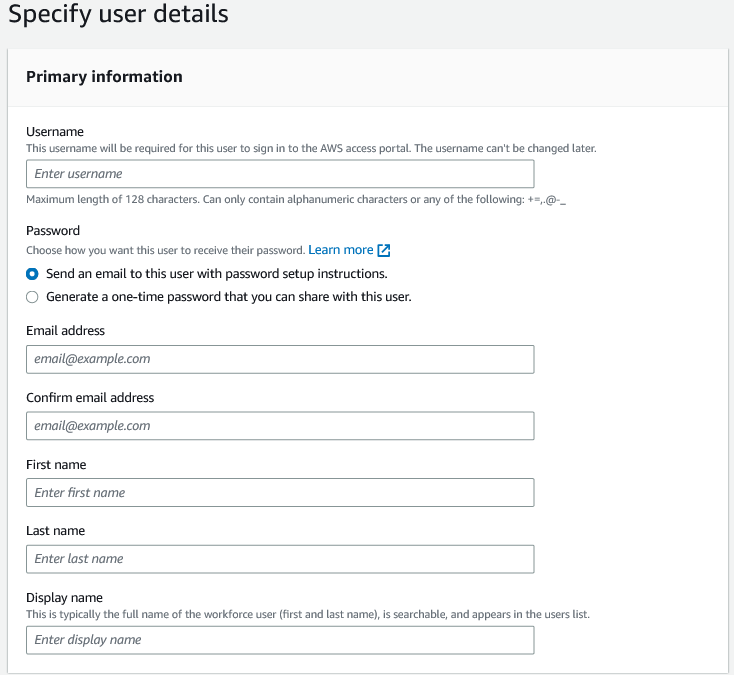
Give your developer a username to sign in with, email address, First Name, Last Name, and Display name. You may also fill in the optional settings if desired. The Password option you can do either option that is available. I personally like sharing the password but in some situations you may want this to be emailed to them by AWS for you.
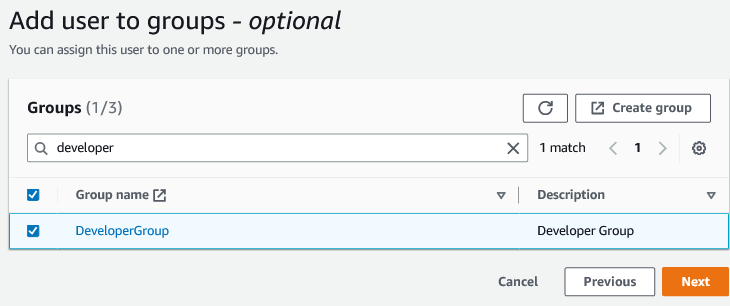
The next step “Add user to groups”, select the Groups you want to assign to the user. In our case, select the “DeveloperGroup” then click “Next”.
The last step “Review and add user”, preview the settings and information then click “Add user”.

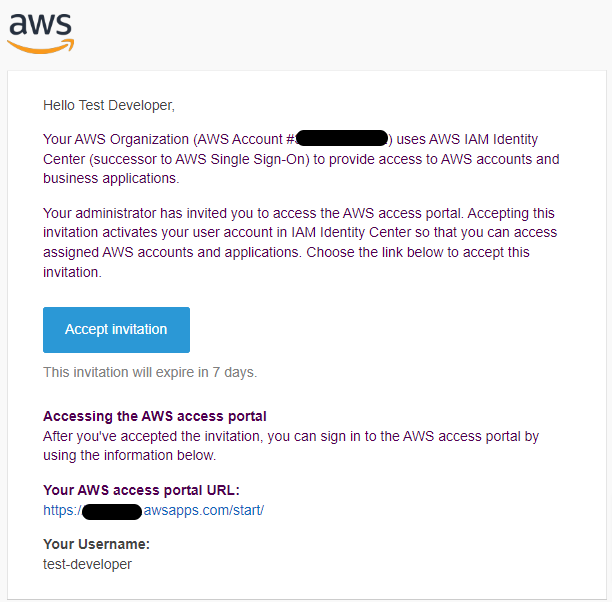
A user successfully added message will appear if all is successful. Your user now has 7 days to click the link in the mail sent to them and setup their account.
Security settings we want to tweak
We’re not done! The default settings need a few tweaks so we can sleep at night. Lets look at tweaking settings to our liking.
On the left menu select “Settings”. Select the 2nd tab “Authentication”. Scroll down to “Multi-factor authentication” then click the “Configure” button. Review the settings on this page.
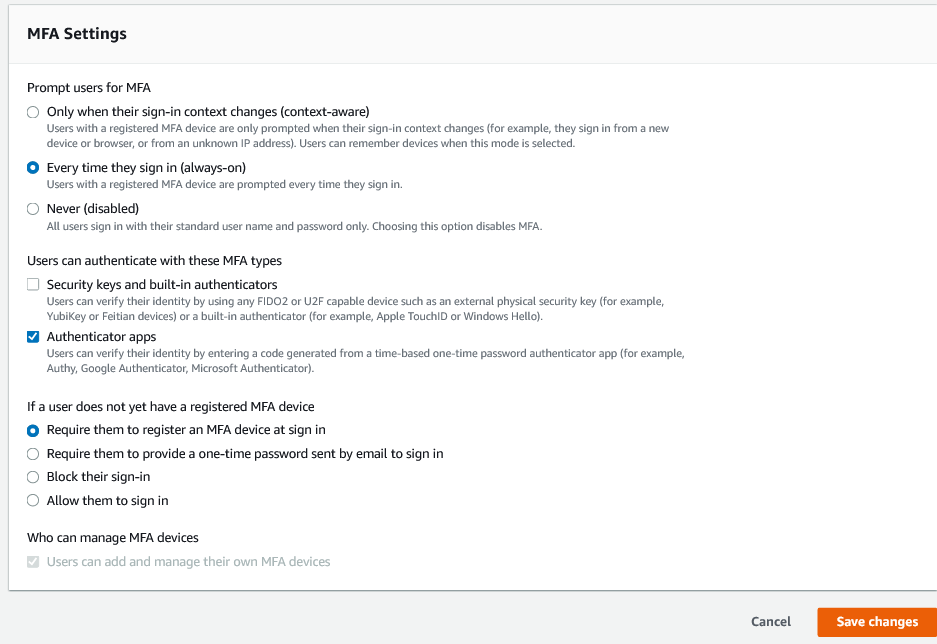
Specifically the setting “If a user does not yet have a registered MFA device”, lets change this to either “Require them to register an MFA device at sign in” (my preference) or “Require them to provide a one-time password sent by email to sign in”. This is to make sure that all users have MFA setup who use your environments.
You will also want to consult your company’s policy on security before leaving the default option for “Prompt users for MFA” setting. I personally do not like to be bugged for the MFA code every time I sign in, but I still use the “Every time they sign in (always-on)” as an extra precaution. If AWS were to add an option to expire a registered MFA device after X days option then I would opt for the “Only when their sign-in context changes (context-aware)” setting and set the expire a registered MFA device after days to 14.
Note: If the developer will also have access to the production accounts, I would insanely strongly absolutely recommend (am I making this clear???) you set the “Prompt users for MFA” to “Every time they sign in (always-on)”. If there is doubt on what to do here, use the “Every time they sign in (always-on)” setting.
What the developer does next
During the account creation process, if you recall we selected the option to have AWS email the developer with instructions how to sign in.
When the developer clicks the button in the email, they will be prompted to set a new password.
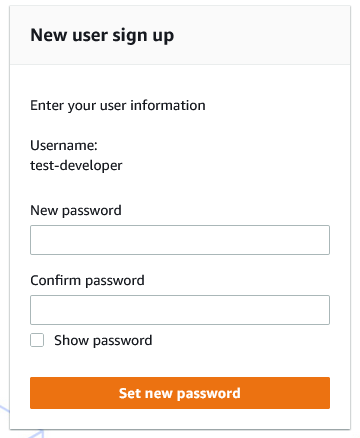
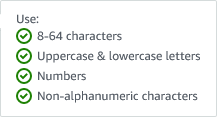
The password is reasonably strict, minimum 8 characters, must have upper and lower case characters, a number and a special character.
Once the developer sets a password, they will be prompted to login. Once they sign in they are immediately prompted to setup Multi-Factor Authentication.
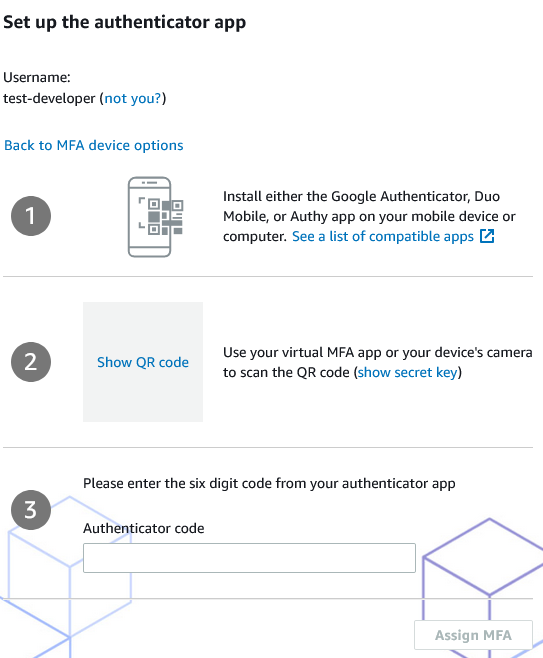
MFA during initial sign in to a IAM Identity Center created account.
Once they have the authenticator app of their choice on their mobile device, they can select the “Show QR code”, scan the the code into their authenticator app, then enter the generated code into the Authenticor code box, and promptly click the “Assign MFA” button.
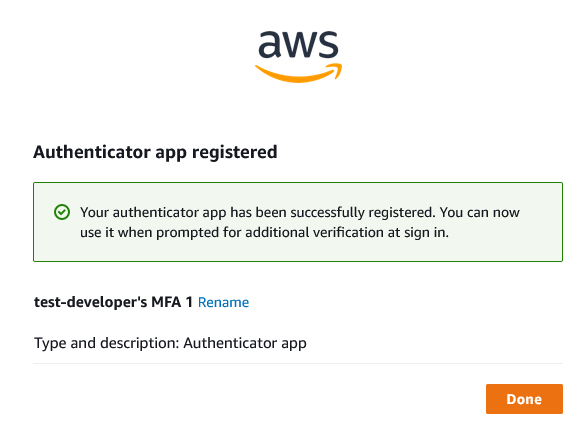
Confirmation that the MFA authentication code was correct and registered.
Now when every they sign in, they will see the following screen:

Clicking the “Management console” takes the developer to the AWS management console for that account.
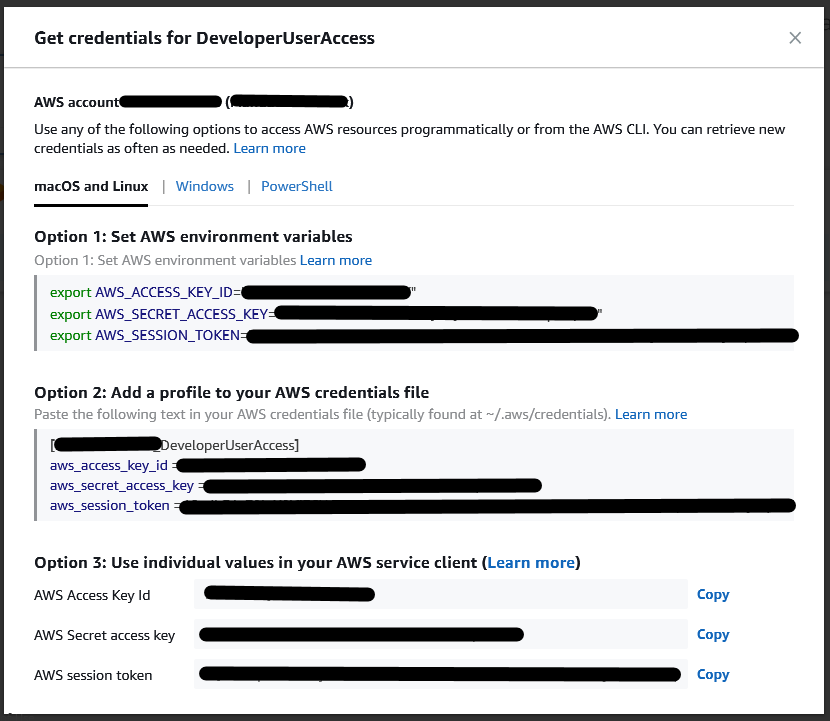
Selecting “Command line or programmatic access” brings up a lightbox view with credentials that can be used for the next few hours.
Conclusion to using IAM Identity Center for giving developers access to AWS accounts
As you can see, following these simple steps you can easily create accounts for developers to access the appropriate AWS accounts intended for development and have access to temporary AWS access keys for command line or programmatic access. If you have any questions or have additional suggestions and tips, please feel free to leave comments below.
